Monday, December 29, 2014

Grand Illusion: Clue 5

Clue 5 is here!  Hooray!  And true to Bonnie's word, this one was super easy.  I started working on it at 8:00 am, and finished by 9:30 am.  No, I wasn't racing to get it finished, it just was truly this easy.

You can download the clue from the Quiltville blog until sometime in March 2014 (yes, this is new!), at which point it will be retired so it can be published as a pattern you can purchase.  If you're even thinking of working on this quilt, download the clues and save them... or else you'll have to wait until you can purchase a copy later.

Grand Illusion Mystery

Every Monday after a clue is posted, Bonnie has a Mystery Link-Up where participants can share photos of their progress, like I've done in this blog.  Be sure to check it out and see all the wonderful variations in color and fabric!

Mystery Monday Link-Up, Part 5

We had to make some easy four-patch units for this clue.  Most of them are aqua (blue) and yellow, while a few are a combination of yellow/black/pink (purple).  I've switched my colors up a bit from Bonnie's, with my color choices indicated in parenthesis.

I'm down to only four of my blue prints, and one of them was mostly used up in this clue.  So, to try to get more variety I kept my strip sets short, using the measurement Bonnie suggested.  Here are my strip sets, sewn and ready to be paired:


I was able to get six unique pairing combinations from these strip sets, so I have a bit of variety in my finished four-patch units.

I didn't have extra black, purple, and yellow pieces left over from previous clues, so I had to cut a few of those.  I only cut from two different blacks and two different purples, but that's OK. I don't mind if they aren't as scrappy as the rest of the quilt.  It's my quilt after all, I can choose to do that if I want LOL.

Here are all my finished units for Clue 5:


Here's hoping you all had a wonderful Christmas Day yesterday, and if you celebrate it, that you have a fun Boxing Day today.  May your heart be full of happiness, and may your soul smile... much like my kids were smiling yesterday.  (Yes, I had to sneak in a picture of my girls LOL.)


And may you have wonderful companionship during these holidays.  Our cat Nuggs says "meow", which is kitty for "hello".  :)


Monday, December 22, 2014

Grand Illusion: Clue 4

Bonnie wasn't joking when she said the next clue would be easier.  We used pieces from a previous clue, cut some more pieces, and had to sew only a few more units (in Bonnie terms) to complete this clue.  I surprised even myself and got it done in a day!

You can download the clue from the Quiltville blog until sometime in March 2014 (yes, this is new!), at which point it will be retired so it can be published as a pattern you can purchase.  If you're even thinking of working on this quilt, download the clues and save them... or else you'll have to wait until you can purchase a copy later.
Grand Illusion Mystery

Every Monday after a clue is posted, Bonnie has a Mystery Link-Up where participants can share photos of their progress, like I've done in this blog.  Be sure to check it out and see all the wonderful variations in color and fabric!

Mystery Monday Link-Up, Part 4

This clue started us out with the extra HST that we made in Clue #1.  We had to make as many more HST using white and aqua (though if you recall, I swapped blue for the aqua).  We also had to cut out some black squares and some yellow squares.

Here are all my pieces, ready for sewing to begin.


There are my HST triangles, already paired up and ready to sew.  I have to admit, at the start of this project I was a little annoyed at the idea of pairing up your fabric strips before cutting with the Easy Angle ruler for the HST units.  But now I'm a complete convert!  Yes, there is a little extra work to be done to get the strips lined up sufficiently, and yes you end up cutting only one pair at a time, but once you get these pre-matched units to the sewing machine, you FLY through them.

After flying through sewing the HSTs, I kept on sewing and paired up the blue/purple units from Clue #1 with black or yellow, depending on which block they were destined for.  When I was done with that... I had a whole lot of pressing to do LOL.


It didn't take long to catch up with the pressing and to continue sewing pieces together until all the blocks were finished.  I have all my Broken Dishes #2 finished:


As well as all my Broken Dishes #3:


Woot!  I'm thrilled to have these done!  I recently picked up a commission project, so I allowed myself today to play... and play I did.  Tomorrow I have to go back to working on the commission.  Grand Illusion is my motivation to keep on top of this commission... if I get enough work done on it through the week, then I can take Fridays off to play LOL.

Until next week....

Monday, December 15, 2014

Grand Illusion: Clue 3

I must admit, I breathed a sigh of relief when I saw Clue #3.  Strip piecing!  Simple units!  Yes, we still had to make a ton of them but strip piecing is so easy and so quick, I didn't mind at all.  :)

You can download the clue from the Quiltville blog until sometime in March 2014 (yes, this is new!), at which point it will be retired so it can be published as a pattern you can purchase.  If you're even thinking of working on this quilt, download the clues and save them... or else you'll have to wait until you can purchase a copy later.

Grand Illusion Mystery

Every Monday after a clue is posted, Bonnie has a Mystery Link-Up where participants can share photos of their progress, like I've done in this blog.  Be sure to check it out and see all the wonderful variations in color and fabric!

Mystery Monday Link-Up, Part 3

Friday happened to be a busy day for me, I was able to download the clue and read it while I ate breakfast but I couldn't do much with it until later in the day.  I did manage to find the time to cut out my strips later in the evening.  I only had four green prints set aside for this mystery but felt that they would be too boring all on their own for this clue LOL.  I dug into my stash and found a few more, not quite in the lime green I had started with but they played nicely together so I added them to the pile.  Here are my strips, cut and ready to be sewn together.


I first paired up a green strip with a white or black strip, until all my strips were sewn together.  Here they are, waiting to be pressed.


I was in the middle of pressing my strips when my iron decided it didn't want to live any more.  It made a popping, crackling kind of noise and then smoke started pouring out of it.  I immediately unplugged it and took it outside.  I couldn't see where the smoke was coming from, so to be safe I hosed it down.  The smoke kept coming out, and if I held it up in front of me, I could see waves of heat rising from the iron... not good.  So I filled a bucket with water and submerged the iron to be certain the fire was put out.

Of course, an iron is needed to finish this clue so I immediately headed out to get a new one.  A girl's got to have her priorities straight LOL!  This is what I came home with. It's lightweight and gets nice and hot.  The only thing I wish is that I could turn off the steam at higher temperatures, but for $30 I can put up with it.


Back to Clue #3!  Once my strip pairs were pressed, I paired up these units until I had enough to cut the pieces needed for the final blocks.  I tried my best to not have duplicate fabrics in each block, for more variety.  Here they are, my finished blocks!


I'm so happy with the way this mystery is turning out so far.  And like all of Bonnie's mysteries, I have no clue how these units will be put together into the final arrangement.. but that's part of the fun.  :)  Now to wait (not so patiently) for Clue #4.

Monday, December 8, 2014

Grand Illusion: Clue 2

Bonnie unveiled Clue #2 yesterday, hooray! 

You can download the clue from the Quiltville blog until sometime around June 2015, at which point it will be retired for inclusion in a future book.  If you're even thinking of working on this quilt, download the clues and save them... or else you'll have to wait until the book comes out.  :)

Grand Illusion Mystery

 Every Monday after a clue is posted, Bonnie has a Mystery Link-Up where participants can share photos of their progress, like I've done in this blog.  Be sure to check it out and see all the wonderful variations in color and fabric!

Mystery Monday Link-Up, Part 2

As soon as I woke up, I ran to my computer to download the clue for myself.  Because I am on the West Coast, my news feed on Facebook was full of photos of units that others to the East of me had made. What fun!  Unfortunately, I had plans to be out in the morning and only had time to make up two test units before I had to leave.


Bonnie gave us three different methods to make this unit.  I tried her template method, my test unit is on the right.  Unfortunately, it came out a little bit too small, by 1/8".  Next I tried the last method she suggested, the sew-and-flip method, and I got a perfectly sized unit... so this is the method I used for the rest of my units.


All my pieces are cut and ready to be sewn!  In order to keep this from being overwhelming, I attacked this in stages.  I would work on 20 units at a time: sew, trim, flip and press.  This made the job seem more manageable and less daunting.


See?  I got all my units sewn in no time!  :)


And look at that pile of trimmings!  I put my rotary cutter next to it so you can see just how large this pile is.  No, I didn't sew them into HSTs, I honestly don't  have the time right now.  I did save them to my crumbs bag, one of these days I would like to make a crumb quilt.


And voila!  All my blocks for Clue #2 are finished!  I'm really liking how my colors are turning out.

At this point, however, I may need to put the mystery aside.  I just had a BIG project dropped in my lap which I will have to focus on as it actually has a deadline LOL.  Or, I might use the mystery as incentive to keep myself motivated on this deadline project so that I can carve out a little time to play.  We will just have to wait and see what happens.  :)

Have fun, everyone!


Sunday, November 30, 2014

Grand Illusion: Clue 1

This past Friday, we got to kick off the Grand Illusion Mystery with Clue #1.  Yippee!  There was much excitement in the air as quilters across the globe hurried to download the clue and get started.

You can download the clue from the Quiltville blog until sometime around June 2015, at which point it will be retired for inclusion in a future book.  If you're even thinking of working on this quilt, download the clues and save them... or else you'll have to wait until the book comes out.  :)

Grand Illusion Mystery

Every Monday after a clue is posted, Bonnie has a Mystery Link-Up where participants can share photos of their progress, like I've done in this blog.  Be sure to check it out and see all the wonderful variations in color and fabric!

Mystery Monday Link-Up, Part 1

If you remember from my last post, I'm mixing my colors up a bit from Bonnie's colors.  Instead of aqua and pink, I'm using blue and purple.  But the black and yellow remain the same.

Here are all my pairs of blue and purple triangles, cut with my Easy Angle ruler, and ready to sew.

Yes, it took a while to get through all of these triangles, but working in chunks I managed to get them all finished!

Once the HST were finished, I cut out my black and yellow squares.  Bonnie is sticking with a single color of yellow in her quilt, so I decided to do the same.  If you choose to go scrappy with your yellows, that's perfectly OK because it is YOUR quilt, make it however you want to!  :)

Once again, I worked in chunks to get the black and yellow squares sewn to the HST, pressed, and then paired up into Broken Dishes blocks as directed by the pattern.

And voila!  Here are all my completed units for Clue 1!

Already I'm having so much fun on this mystery, and I can hardly wait for Clue #2 to come out.  Of course, I've got plans to be out and about for a large chunk of Friday, and I'll be in a 12K running race on Saturday... think I can get the clue done on Sunday?  We'll just have to wait and see what happens.  :)

Sunday, October 19, 2014

Making Grand Illusion: Colors

Yippee!  It's time for the next Bonnie Hunter mystery!  She gave us a nice surprise by announcing the name and posting her colors and required yardage a few days earlier than in years past.

This year's mystery is called Grand Illusion.  Here is a link to her Intro with colors and yardage:
Quiltville's Grand Illusion Intro

With Bonnie's mysteries, sometimes her colors call to me, such as Easy Street.  I had to make that quilt based on the colors alone LOL.  Sometimes, the colors don't speak to me at all or I have been inspired by another color scheme and I switch out the colors, such as with Celtic Solstice.  This year, I liked some of the colors she chose, but not others, so I'm mixing things up and making the colors mine.

Not wanting to rush anything, I gave myself time to consider my color choices.  One person on Quiltville's Open Studio swapped the pink for purple, and I really liked that.  But then I'd have a quilt with green, teal, and purple again, which is already in Easy Street and I didn't want my colors to be too similar.  I hemmed and hawed, until one night while binding a quilt I looked over at the spools of thread I had on the table.  There was a spool of bright green and a spool of bright blue sitting next to each other, and I loved the way they looked.  Then it hit me... these would be great colors to use for my Grand Illusion quilt!

Without further ado, here are my colors for Grand Illusion:

I will keep the black and the yellow that Bonnie indicated.  I'm keeping my neutrals white, I have a mix of white-on-white fabrics and some with a light print and a white background.  I will swap purple in place of pink.  My greens are brighter, and I'm using bright blue instead of teal.  My colors are jewel tones, and I think it's going to look very nice.  :)

Thursday, May 29, 2014

Repairing a Quilt from 1941


Recently, I was given the honor of repairing a quilt made in 1941.  I adore antique quilts, and having the chance to help bring this one back to life was an honor and an amazing experience.

It is a beautiful Sunbonnet Sue quilt with very detailed Sues appliqued and embroidered to a butter yellow background.  The entire quilt was sewn by hand, and then quilted by hand.  The blocks were quilted with diagonals, and the border quilted with a feathered swag and a cross-hatch pattern.  The edge was finished with prairie points.

My client's relative (grandmother, I think?) made this quilt and it has been well loved over the years.  It eventually went into storage, the relative passed away, and later a niece was born and named after the relative, so the decision was made to give the niece this quilt.  They pulled it out of storage, to find it moth damaged, stained, and in need of some TLC.

This is the quilt, before I did any work on it:


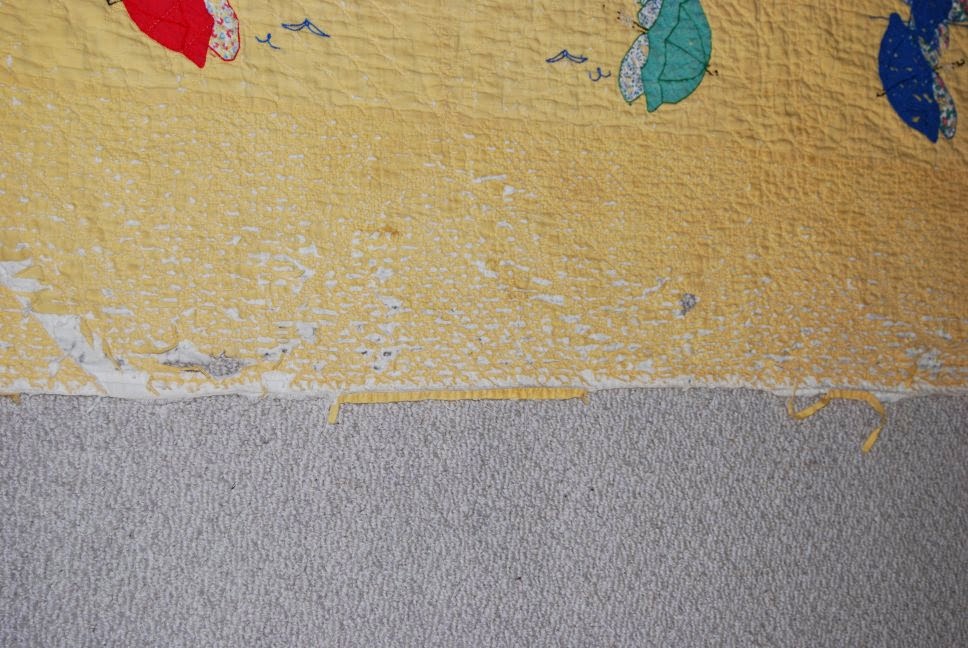
It's lovely and I'm sure was simply stunning when it was brand new, but time has not been kind to it.  The quilt had been washed to try and remove the stain, but it was not entirely successful.  There is a hole in the quilt, to the right of the stain, between the purple and green Sues.  The prairie points are disintegrating, and the fabric of the top border is fraying away.

Since my client just wanted the quilt stabilized and not completely repaired (which I don't think I could have done, to be honest), we focused on the two big things:  The hole in the quilt and the fraying borders.  I also recommended turning the quilt into a wall hanging, so that it could be viewed and enjoyed, but in a way that would be much safer for the quilt than actually being on a young girl's bed.

The first thing I did was to tackle the hole in the quilt.  Here is a close-up image of the hole before I worked with it:


One good thing about this hole is it allowed me to see into the quilt, so I could see how it was constructed.  Older quilts didn't always use batting in the center, sometimes old thin blankets known as sheet blankets were used.  Sometimes a piece of flannel was used.  I could see that this quilt did in fact use a very thin batting, so I dug through my batting scraps to find a suitably thin piece to use to patch the hole.

To get my batting piece the right shape, I first put a piece of paper under the quilt, so I could trace the shape of the hole onto the paper, and used that as a pattern to cut the batting piece.  I then stitched it into place by hand using a big basting stitch.


Once the batting was secured, I made a template from clear template plastic to make an applique shape that I could sew on top of the hole.  It needed to be big enough to completely cover the batting and basting stitches, and so that the edges of the applique piece were over good, solid fabric that would be able to take my stitches as I appliqued it in place.

The clear template plastic ensured that I could see the hole and the fabric around it so I could trace my applique shape adequately large.  Then I cut out two applique pieces, one in yellow for the front of the quilt and one in white for the back (as the backing was muslin).  With matching thread, I hand stitched the applique pieces both on the top and the back of the quilt.


After the applique pieces were both sewn on, I quilted over the patch, following the lines of quilting that already existed.  Though the hand quilting was done with white thread, I was afraid that machine quilting with white thread would be too visible and look out of place, so I used matching thread instead.  It helps the new quilting to blend in with the existing quilting.


Now that the hole has been repaired and the quilt has been stabilized, it is time to repair the borders.  The easiest way to do this was to simply sew new fabric on top of the existing borders and quilt the new fabric to the quilt.  I must admit, even though the borders were in bad shape, it almost killed me to cover up the beautiful hand quilting.  At least it is still visible on the back of the quilt!

See what I mean?  Beautiful!


But this was the state of the top border on the quilt, you can see how badly damaged it is.  Something simply had to be done to repair the borders.


First things first, I had to trim off the prairie points.  Then, using the same yellow fabric I used to patch the hole, I sewed new border fabric onto the quilt top, with the raw edge of the new border fabric following the seam line of the original borders.  I used the same matching thread to do the quilting, making a straight line pattern that almost mimics the look of a piano key border.  This quilting was easy to do and maintained the style decision of the maker to have the quilting of the borders differ from the quilting in the blocks.


Once the new borders had been completed, I added a basic binding around the whole quilt to finish it.  I also added a hanging sleeve on the back of the quilt, using a piece of 1930's reproduction fabric from my stash that complimented the fabrics in the Sues' dresses on the quilt front.

Here is the repaired quilt:


My client was very happy with the quilt repairs, and I had a fantastic time doing what I could do help preserve this piece of quilting history.

What about you?  Have you ever had an opportunity to repair or restore an antique quilt?

Saturday, February 8, 2014

Celtic Solstice: Finished!

 
It's done!  My Celtic Solstice quilt is finally done!

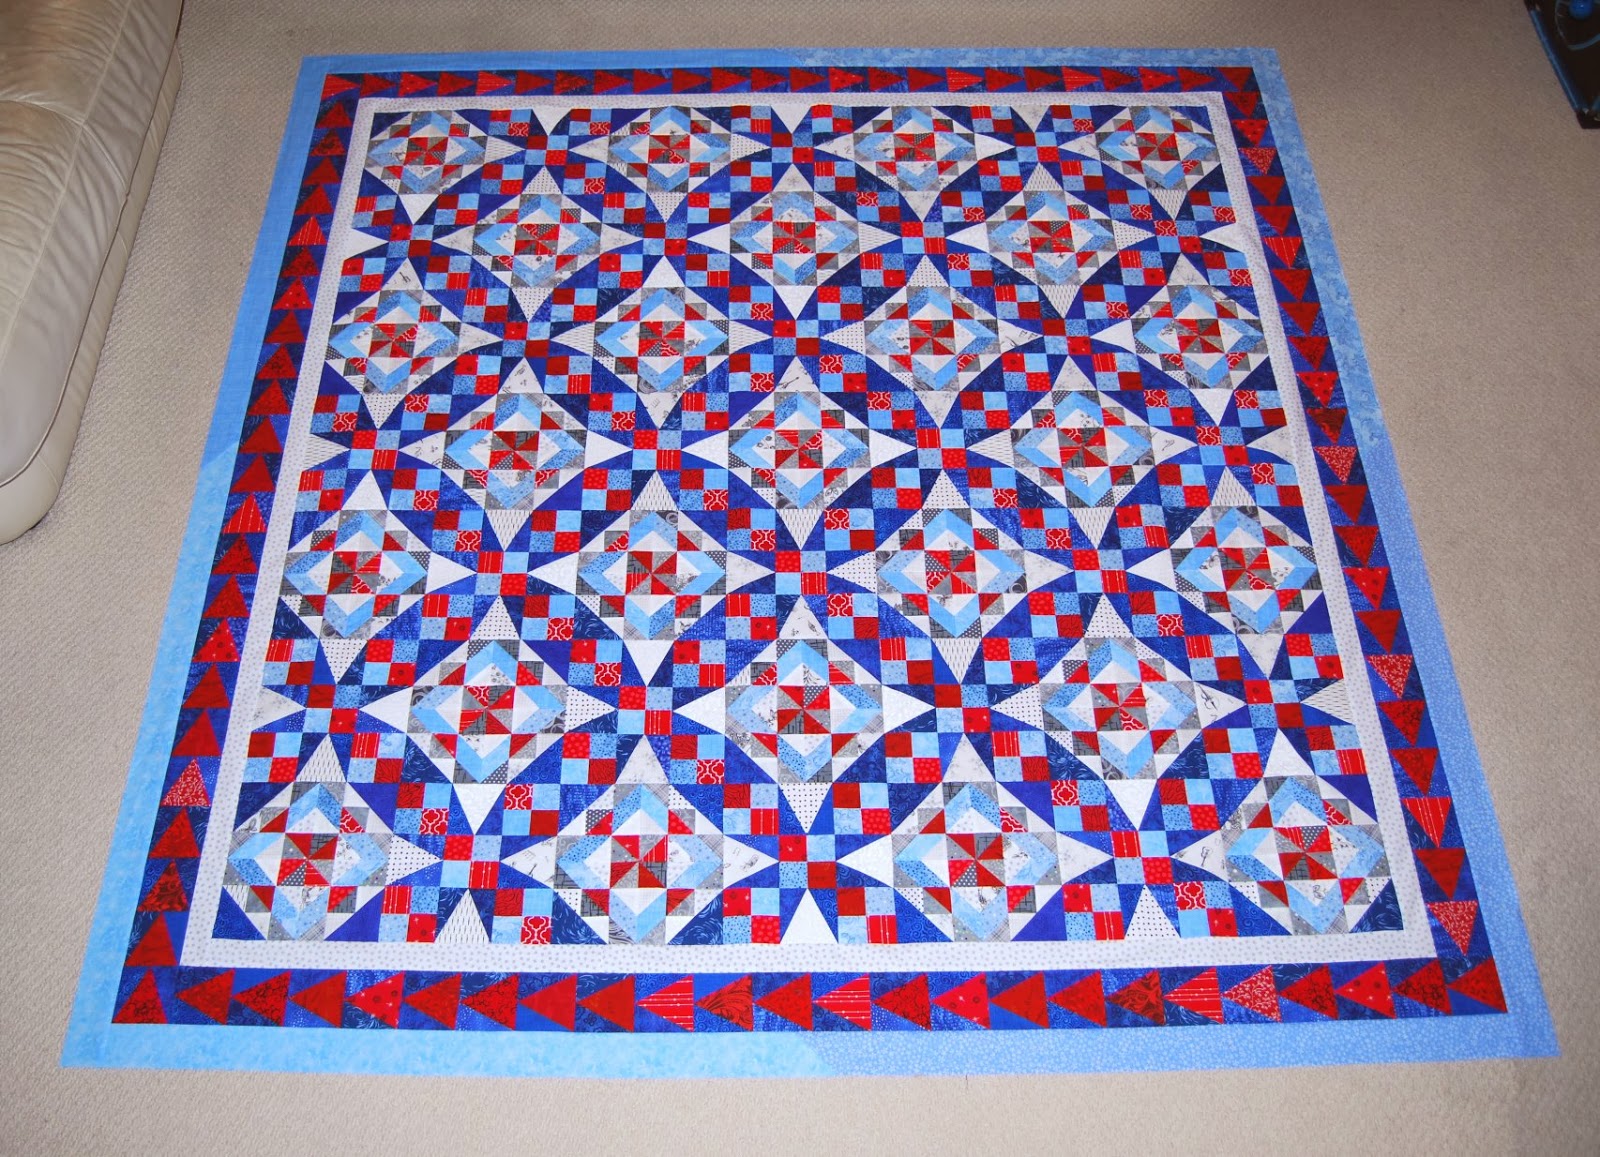
I made the smaller version of the quilt, but it wasn't quite large enough for my needs so I extended it a bit.  I added the checkerboard border to the top and bottom of the quilt to lengthen it a little, and I also added a border all around the quilt, using a grey print that was too perfect to pass up.


I mean, look at that print!  It really mimics the effect that the pieced blocks in Bonnie's quilt achieve.  This wasn't exactly what I had in mind when I went looking for a border fabric, but it fits the bill perfectly and I'm glad I used it.


I quilted it with a simple meander, which will be fine for a bed quilt.  The meander gives the quilt texture without being too complicated, plus I didn't have a pantograph that really seemed to "go" with the quilt.  I used white thread for the quilting, I really had wanted a light blue but none of my blue threads looked right.  That's OK, the white worked just fine.


Thank you Bonnie, for once again writing and sharing a fantastic Mystery Quilt project.  You can see other folks' finished quilts at her last Link-Up of the project.

Sunday, February 2, 2014

My Little Labels

I have decided I'm going to try selling some homemade items at a Holiday Bazaar next year, which means the time to start making those items is NOW.  :)

I want my items to have a  professional look to them, so I decided I wanted some labels to sew onto my projects.  Not big huge tags, but little ones like you see sewn onto the hemlines of some shirts, or sticking out from the trim on a bag.  Then I came across a link on Pinterest that talked about exactly the kind of labels I was wanting.  That blog writer recommended this Etsy shop, where she had her labels made:

Worldwide Label

This shop is located in Hong Kong, and I guess they must deal with large volumes of label making because (to me) the communication was pretty slow.  I'd ask a question, and it might be 2-3 days (sometimes more) before getting a response.  Of course, I'm always on the computer and I'm very much a now.Now.NOW kind of person, so to me a response time longer than a day is "slow".  So take that into consideration LOL.  However, despite my impatience, they were very professional, answered my questions well, and the end result blew me away.

Finally, after much anticipation, my labels arrived!


Aren't they just too cute?  They turned out beautifully, exactly what I was wanting.  And they're the perfect little size to add on to my sewn projects.  Of course, I had to try them out as soon as I got them out of the box, so I made some rice-filled neck ice/heat packs and sewed a label into each one.


Here they are!  My first items with my tag sewn on.  How cute did they turn out?  Oh, I'm so excited!


I have 300 of these little labels to use up, so I'd better get cracking with making my items.  :)

Sunday, January 5, 2014

Making Celtic Solstice: Final Reveal


Bonnie surprised us by publishing the final clue of Celtic Solstice on New Year's Day!  It was definitely fun to see the final design and how all our units played together, but at the same time it was a sad day, knowing that we were done playing until next year.  Be that as it may, I got right to work on assembling my quilt.

First, we put together these blocks:


Next, we put together these blocks:


The blocks are set together so they alternate:


What a fantastic secondary design they create once they are put together!  I nearly fell over when I saw Bonnie's quilt all finished.  Of course, I had to lay out a few rows to see how the design would look in my colors:


Squeeeee!  Oh wow, I'm really loving this!

It took me 2 days to get the blocks assembled and the rows sewn together.  There I had to let this project sit while I got some work done on a project with a deadline.  But today was my play day, the day I save for MY projects, so I buckled down and finished my top:


Wowsa!  I really like the way this quilt has turned out!  This is as far as Bonnie's pattern took us.  However, I do have a plan to make the quilt bigger by adding a row of chevrons along the top and bottom, and then adding yet another border all the way around.


I may still do this, if I can find the right print for that outer most border.  I want to bring out more of the grey that is in the quilt, so if I can find a suitable print in grey with maybe some red and blue in it, that would be perfect.  I'm also rethinking the chevrons, I may instead make pinwheels or maybe 4-patches.  Do you have any thoughts on the matter?