Monday, February 20, 2012

Thimbles Up!


Bonnie Hunter at Quiltville is having a "Thimbles-Up" Linky Party, as described in this blog post.  We're to post about our thimbles, what we have, why they work for us, and so on.  What fun!  How could I NOT join in?  :)

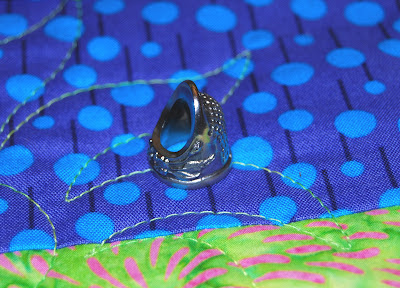
The picture above shows my thimble, which I use for hand sewing my bindings, hand quilting (not that I do a lot of that, you know), pretty much any kind of hand sewing I need to do.  This is a Roxanne Thimble, and it's the best thimble I have ever owned.

Before finding this one, I always had issues with finding thimbles that fit well and also lasted a long time.  I never liked "traditional" thimbles, they didn't stay in place and just felt odd on my finger.  Until I discovered leather thimbles, I simply sewed without a thimble and suffered the pain and torn skin on my finger. Leather thimbles were the first thimbles that I could tolerate.  They fit well enough, but after time I would wear a hole through the leather and then I'd be back to wearing a hole in my finger LOL.

Then I heard about Roxanne Thimbles.  I saw one in person, and I knew I had to give one a try.


I love the pretty details on the front and sides of the thimble.  I also like that the front of the thimble is open and gives my fingernail room.  That was a complaint I had about the "traditional" thimbles you commonly find, they were never all that comfortable... especially if I let my fingernails grow past the end of my fingertip.


I also love how many dimples there are on the back of my Roxanne thimble.  No matter what angle I'm coming from, I can always find a dimple for my needle to rest in.  I don't think I've ever had the needle slip on me while I'm sewing.  The fingers on my other hand are thankful for that LOL.


And besides, it looks so pretty when it's on my finger!  I've been known to forget that I have it on and wear it around the house LOL.

Now, if you're considering buying one of these, I will warn you that they are expensive.  I got one of the silver plated thimbles (which is also the least expensive), and that currently sells for around $50.  I know, that's a lot for a thimble... but if you do a lot of hand sewing or quilting, IMHO it's worth it.  It is the last thimble you will ever need to buy.

They are sized like rings are sized, so you can pick the one that fits you best.  While you can order one online, I would recommend that you find a local dealer that has some that you can actually try on to find the best fit.  They're a good weight and feel fantastic on your finger, but they're not so heavy that they make your finger feel weighed down.

I hope you enjoyed reading about my favorite thimble.  Now let's get back to sewing!  :)

Sunday, February 12, 2012

My New Iron


This is my Oliso, my current iron which I bought on the recommendation of a friend.  It is a really neat iron, honestly.  There are feet under the iron that raise it up off the ironing board until you touch the handle, at which time it lowers itself to the ironing board and you can happily iron your quilting, your laundry, whatever.  It's really neat and the iron has been doing a nice job.

Unfortunately, my Oliso is dying.  When I plug it in, half the time it doesn't even finish heating up before it goes into auto-off mode.  Even when I do get it to heat up all the way, often times it will go into auto-off mode within a minute or less after I've been using it.  And conversely, sometimes I will leave it for long periods of time as I cut out more fabric... and not once will it go into auto-off mode UNTIL I'm just about ready to use it.  And the steam function just isn't working well any more, even though I've descaled it very recently.

The other unfortunate thing is that this is not a cheap iron.  I bought this to replace a Rowenta (also not a cheap iron) whose water compartment had burst and was hemmoraging water all over my quilting.  (I know, some people say the fastest way to kill an iron is to put water in it, but I love using a burst of steam to really get those seam allowances pressed crisply.)

I've decided that since these expensive irons don't seem to last any longer than the less expensive ones, I'm just going to get less expensive irons from now on.  I'd rather pay $25 every couple years than $100 every couple years!

So, without further ado, here is my new iron:


I know what you're thinking.  "Huh?  That's NEW?!?"  Yes, it is!  I just bought it at Target yesterday for about $28.  It's a Black & Decker "The Classic".  It's pretty retro in styling, and to be honest I really like the way it looks.  It's got some good weight to it but not as much as those heavy Rowenta irons.  And of all the irons at Target, it was the only one with a soleplate that looked like this:


You see the two rows of holes for steam to blast onto the fabric?  All of the other irons only had one row... not enough for me.  I wanted to be sure that the steam actually hit the seam I'm pressing, not just the fabric all around it.

Now, I just need to eat some lunch so I can have lots of energy to play with my new iron.  Yes, I'm excited to have a new iron.  I know, I'm weird that way.  LOL!  Happy quilting everyone!

Friday, February 3, 2012

Quilt As You Go


Have you heard of the Quilt As You Go technique?  It's really pretty neat, you quilt your block as you make it, so that in the end you just have to join the blocks together and your quilt is done... all except for the binding, but I've given you tutorials on how to do that already.  :)

The most common kind of QAYG block is the string block, as was used to make the quilt at the top of this post.  String blocks might seem somewhat boring, but there are many ways to liven them up.  One of my favorites is to arrange your strings in a color gradation, like so:


Even though the most common QAYG block is a string block, there are other ways to make QAYG blocks.  You can make machine applique blocks with the QAYG technique:


I even give you a technique by which you can do paper pieced QAYG blocks, like this one:


If you want to learn more, download my free eBook.  The file is 19MB so it may take some time to download, but please be patient.  I think you'll like what you see.  :)  The download link is on this page:

http://www.valeriecustomquilting.com/Patterns_Books.php

Have fun playing!  If you do use this technique, please share your photos with me.  It would be so much fun to see how you put your own personal spin on this idea.  :)


Wednesday, February 1, 2012

Binding By Machine


OK, I've already given you the tutorial on doing your binding the "traditional" way, where you sew the binding to the front of your quilt, wrap it around to the back, and hem in place by hand.  You can find that tutorial here:

http://valeriespatchwork.blogspot.com/2012/01/bginners-guide-to-binding.html

But what happens if you're in a hurry and need to do it by machine?  What if your backing is fleece or some other material that just doesn't lend itself well to hand stitching?  You can always do the entire job by machine.


This tutorial assumes that you have no experience at all with making quilt bindings, so it will take you through all the steps from cutting your strips to finishing with the machine.  You can download it here.

http://www.valeriecustomquilting.com/tutorials/VCQTutorial_BindingByMachine.pdf

Like the other tutorial, it is somewhat large and may take a while to download, so please be patient.  It is also full of photos and lots of good information so you can successfully bind your quilt.  Have fun!